The post Step to configure Apache virtual hosts on Ubuntu. appeared first on .
]]>we are using windows subsystem for Linux and ubuntu 18. In this article, I believe that you already enabled your windows subsystem for Linux and Apache is installed. if not then enable your subsystem for Linux by reading this article. you can read this article for step to install LAMP stack on windows subsystem here.
Step One create folders
Create at least two project folder under var/www/html directory. I have created domain_one and domain_two folder under the html directory. you can create by running following command on your terminal.
sudo mkdir /var/www/html/workspace/domain_onesudo mkdir /var/www/html/workspace/domain_twoStep two Create an index file
Go to the domain_one by running following the command.
cd /var/www/html/workspace/domain_one/create an index.html file inside the domain_one folder
sudo nano index.htmlhere I use the nano command for creating the file. if you did not know about what nano is then you can know more from here.
paste the following code and save the file by using ctrl+e followed by Y and Enter key.
<!DOCTYPE html>
<html lang="en">
<head>
    <meta charset="UTF-8">
    <meta name="viewport" content="width=device-width, initial-scale=1.0">
    <meta http-equiv="X-UA-Compatible" content="ie=edge">
    <title>Document</title>
</head>
<body>
    <h1>This is domain one testing </h1>
</body>
</html>
create the same index.html file with different text inside h1 tag under domain_two folder.
Step three creates the configuration file
after creating an index file we need to create an apache configuration file for each project. lets create conf file inside /etc/apache2/sites-available. Apache already shipped with the 00- default.conf file just copy the 00- default.conf file.
sudo cp /etc/apache2/sites-available/000-default.conf /etc/apache2/sites-available/domain_one.confsudo cp /etc/apache2/sites-available/000-default.conf /etc/apache2/sites-available/domain_two.confNOTE: the extension of the file must have to be on .conf otherwise Apache will not recognize the file.
Step four change .conf file
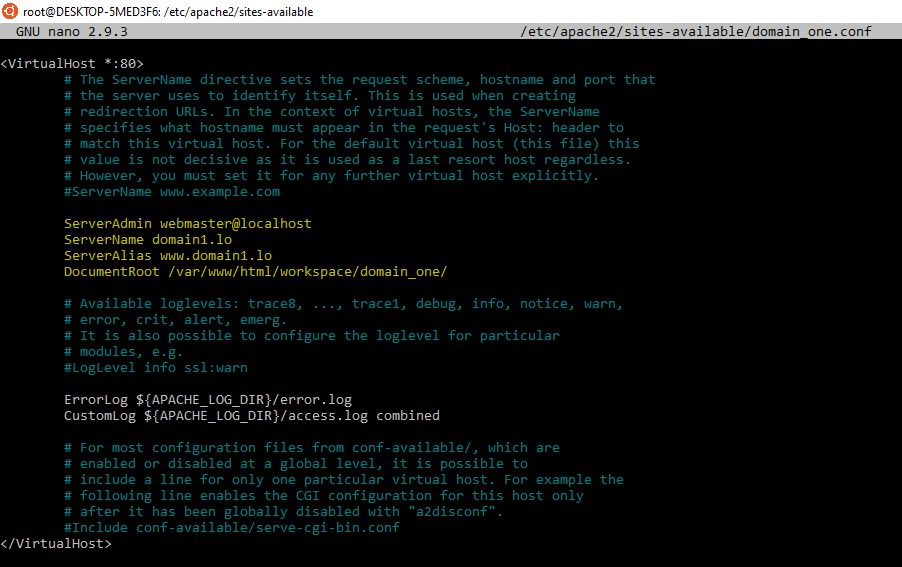
Now we are going to define our directory root and name of the domain for domain_one project. open the .conf file with nano by running following command.
sudo nano /etc/apache2/sites-available/ostechnix1.lan.confAdd ServerName and ServerAlias as your domain name. define the document root of your folder.
Your configuration must look like the given image.
Now change .conf file of domain_two
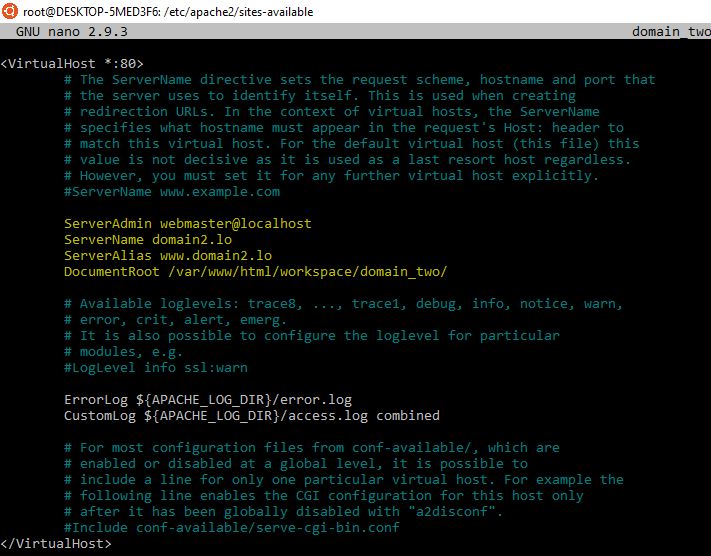
save the file with ctrl+e followed by the key Y and enter.
Step five Enable Hosts conf file.
after completion of editing .conf file, we need to enable the configuration.
sudo a2dissite 000-default.confsudo a2dissite domain_one.confsudo a2dissite domain_2.confStep six add the domain name on the host file.
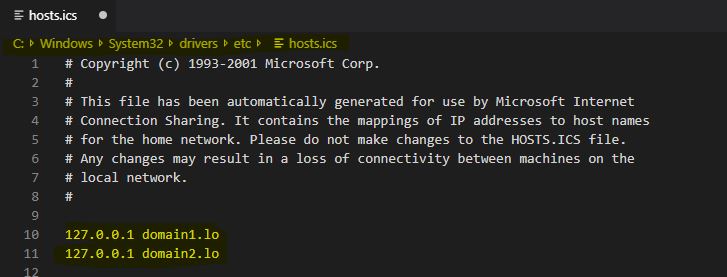
Open the host file from your windows system. you can find the host file under Windows\System32\drivers\etc. open the file in any text editor. add the following two-line at the end of the file. make sure you have provided enough permission to change the host file.
Step seven Restart the Apache
after all the setting is completed Apache needs to restart to implement all changes. restart by running following command in terminal.
sudo service apache2 restart
or
sudo service apache2 reload
now go to your browser and enter http://domain1.lo and http://domain1.lo if you have followed this tutorial then you will see like the following the screen


this is the Step to configure Apache virtual hosts on Ubuntu. if you find any problem setting up a virtual host let me know in the comment section. this is the end of this article I hope you like the article. thank you Happy Codding.
The post Step to configure Apache virtual hosts on Ubuntu. appeared first on .
]]>